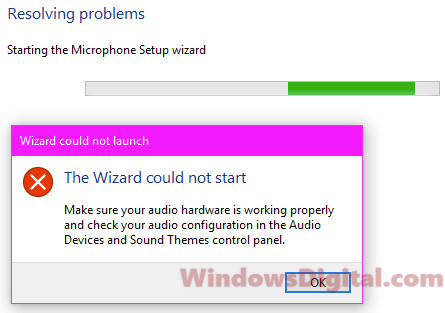
When attempting to set up your microphone through Ease of Access or Speech Recognition in the Windows 11 or Windows 10 control panel, you may encounter an error that states “The Wizard could not start microphone.” The accompanying description reads, “Make sure your audio hardware is working properly and check your audio configuration in the Audio Devices and Sound Themes control panel.”
This issue can sometimes occur after a major Windows update, which could cause hardware drivers in your computer to become incompatible or new features to create conflicts between devices.
How to fix “The Wizard could not start microphone” error
If you’re experiencing the “Wizard could not start microphone” error in Windows 10/11, try these solutions to troubleshoot the problem and get your microphone working properly again.
Page Contents
Check microphone privacy settings
In many cases, this error occurs because the microphone is disabled in the Windows privacy settings. Here’s how to check and enable the appropriate settings:
For Windows 10:
- Press Win+i to open the Settings app.
- Select “Privacy”.
- From the left pane, select “Microphone”.
- On the right pane under “Allow apps to access your Microphone,” make sure the toggle is set to On.
- Retry the speech setup and see if the error persists.

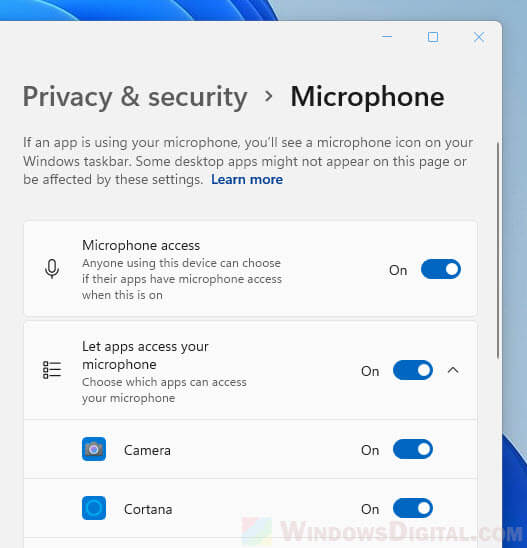
For Windows 11:
- Open the Settings app.
- Navigate to Privacy & Security > Microphone.
- Ensure both the “Microphone access” and “Let apps access your microphone” options are turned On.
- Tip: From here, you can configure which apps can access your microphone using the toggles.
Update or reinstall the microphone’s driver
When there is a new Windows update, devices such as the microphone could become incompatible with the latest update and, thus, need a driver update. If you know how to search for or where to download the microphone’s driver, download and install it and see if it fixes the problem.
If you don’t know if your microphone’s driver is updated or even working, try to uninstall it and run Windows Update again to let Windows install the latest driver for you. Here’s how to do it:
- Go to start menu / Windows Search.
- Search for Device Manager and open it.
- In Device Manager, expand Audio inputs and outputs.
- Right-click your microphone and click on “Update driver.”
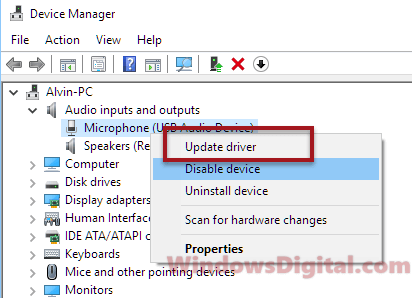
- If an update is installed, try setting up your microphone again and see if it works.
- If no update was installed, right-click it again and select “Uninstall device.”
- Restart your PC. Windows should automatically find the best driver from Microsoft’s drivers repository and install it for your microphone.
Update your sound card driver
This is the workaround that actually solved my issue with the “Wizard could not start microphone” error in Windows 11/10. Whether you are using a specific sound card or the built-in sound controllers on your motherboard, you will need to make sure they are updated and working as intended. A sound card is a device that allows communication between your microphone and your computer. If it stops working, neither your speaker nor your microphone would work.
To update your sound card driver via Device Manager, follow these steps:
- Go to Device Manager as shown in the steps above.
- Expand Sound, video, and game controllers.
- Right-click the sound driver you are currently using and select Update Driver.
- Select Search automatically for updated driver software. Windows will automatically search for and download the latest compatible sound driver for your device.
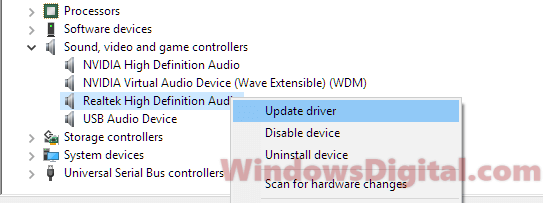
In most cases, we use Realtek High Definition Audio. For some people who use specific sound cards, it will be otherwise, such as Nvidia High Definition Audio or USB Audio Device. If you are not sure which driver you are using, right-click each one of them and update all of them.
If updating or reinstalling the driver doesn’t work, or if you don’t see your microphone or your sound card driver from the list in device manager, try the next solution.
Move the microphone plug from front jack to rear jack or vice versa
Try to reinsert the microphone jack first to make sure it’s not because of a loose connection of the jack. If it doesn’t work, try to move the microphone plug from front to rear jack or vice versa if your microphone was using the rear jack. Then, try to set up the microphone again.
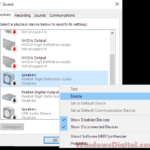
Check if your preferred Microphone is enabled and set as default
Windows update will sometimes cause conflicts between hardware, especially when you have multiple devices of the same type. For example, if you have more than one microphone (which often happens in laptops since most of them have a built-in microphone), Windows will sometimes be unable to identify which one to use.
To check if your microphone is selected, enabled, and set as default, follow these steps:
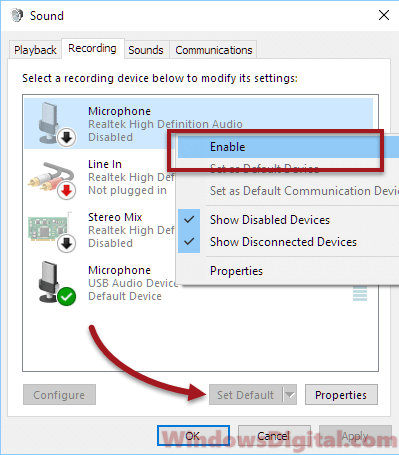
- Go to the start menu and search for Sound.
- Go to the Recording tab.
- Right-click on your preferred microphone and select “Enable.”
- While it’s selected, click “Set as default” at the bottom.
- Go ahead and set up your microphone again.