System Restore is a very useful and important tool in Windows 11/10. It helps you fix errors, remove malware (still have to be used along with an antivirus program), and more by restoring your computer to a previous state. In this guide, we’ll show you how to turn on System Restore and make restore points by yourself.
Note: Turning on System Restore now will start saving restore points from now onward. If you do a system restore later, it will go back to the latest saved point. Making a restore point after something bad happens won’t undo the bad event. If there’s no restore point, your best choice is to reset Windows 11/10 to factory settings.
Page Contents
Enable System Restore in Windows 11/10
System Restore usually turns on by itself in Windows 11/10. But sometimes, it might be off, and you might not know why. So, it’s good to check if it’s on and turn it on if it’s not. This protects you from future problems.
- Go to the Start menu.
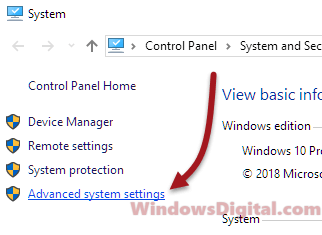
- Look for System and open it. (In Windows 11, search for “Advanced system settings” in Start and skip the next step.)
- Click Advanced system settings on the left.
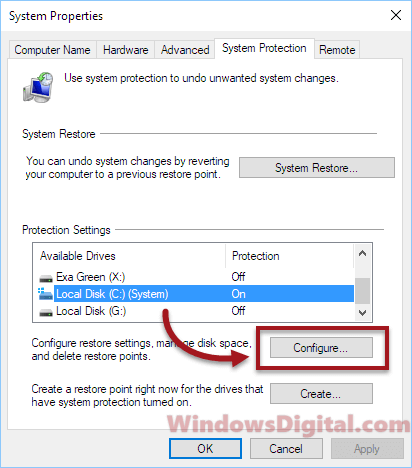
- Go to the System Protection tab.
- If there are no restore points, the System Restore button won’t work.
- Pick your main drive, usually C:.
- Click Configure.
- Choose Turn on system protection.
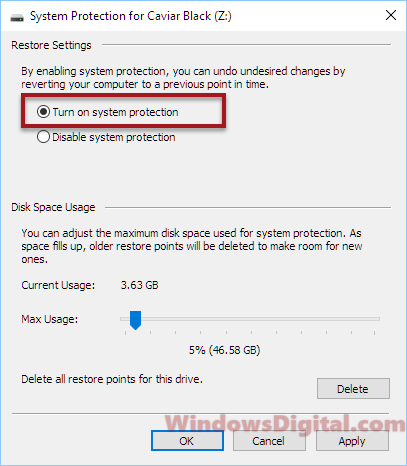
- Set how much space to use for System Restore. More space means more restore points.
- Hit Apply, then OK.
When System Restore is on, it makes its first restore point right away. It will make more over time. If it runs out of space, it will delete older ones.
Create system restore point manually
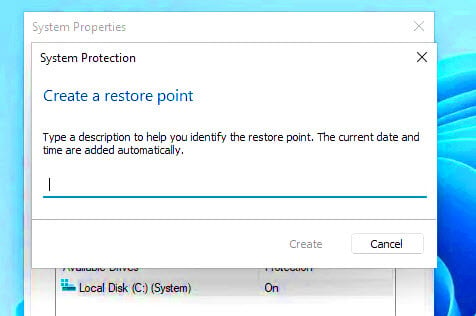
To make a restore point yourself, do the steps above until step 7. But instead of clicking Configure, click Create. Name the restore point whatever you like and click Create to save the current state of your system.
Additional tip: If you’re running out of space, deleting old restore points can free up space. But, this means you might not be able to go back if needed. Only delete them if you think you won’t need them. Even if you delete them, as long as System Restore is on, it will make new ones.
To go back to an earlier time on Windows 11/10, read: How to system restore Windows 11/10.
How can System Restore help?
System Restore is great for keeping your Windows computer safe. It’s good for:
- Going back if updates or new software mess up your system.
- Getting rid of malware by going back to a clean state (in most cases, you will still need to run a full scan with a proper anti-malware program).
- Fixing settings that make your computer act weird.
- Maybe getting back a file you deleted by accident.
- Fixing problems without wasting too much time.
Common scenarios for using the feature
The below are some scenarios where System Restore comes in handy:
- If new software or drivers cause problems, go back to a previous state to fix it.
- If your computer keeps crashing or freezing, going back might fix it too.
- If a Windows update doesn’t work right, use System Restore and try again.
- If malware gets on your computer, you can revert some damages by going back to before it happened.
What System Restore cannot do
While System Restore sometimes sounds like a superhero for your computer, there are some things it can’t fix:
- It doesn’t back up your personal files, so if you lose them, System Restore won’t bring them back.
- It can’t help with hardware issues. If something’s wrong with your computer’s hardware, System Restore won’t fix it, obviously.
- It won’t remove every virus or malware. Some nasty bugs can hide from System Restore, so you might still need to clean those out another way, usually by using a reputable security software.
- If your computer is really messed up, sometimes System Restore might not work. It’s good, but it’s not magic.
But know that, System Restore isn’t the same as keeping backups of your files. Always back up your important stuff to avoid losing it if something bad happens.
Testing if System Restore is working properly
It’s one thing to get System Restore all set up, but how can you be sure it’s really doing its job? Giving it a quick test can set your mind at ease. Here’s a straightforward way to see if System Restore is on point:
- First up, set up a new restore point and call it “Test Restore Point.” Just follow the steps we’ve already covered in this guide.
- Then, tweak something small on your computer that you’ll notice—like changing your desktop wallpaper or dropping a fake file on your desktop.
- After that, roll back time with System Restore to “Test Restore Point.” It should reverse that little tweak you made, such as switching your wallpaper back or making that fake file vanish.
- If everything reverts back to the way it was before, you’re golden! System Restore is working along just fine. If things don’t go back to normal, you might want to double-check your settings.
This quick test doesn’t eat up much time, but it can really save you from a huge hassle later by making sure System Restore is all set and ready to bail you out when you’re in trouble.